Thursday, December 29, 2011

Beaded Bead & Leather bracelet

What happens when little beads grow up and want to become Beaded Beads? Why they become bracelets and earrings and necklaces, of course! This obsession with little beads just takes over and becomes so much more...those of you who create with seed beads will understand. I'm off on another adventure and creating more beaded beads again, this time showing more ways to use them once completed.
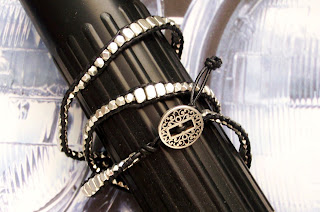
Here is one way to use the simplest of round beaded beads, add them to strips of leather and simply tie in place. One larger bead was made with five round beads in the base instead of four, this one was added last so it could serve as the "button" bead. A doubled over piece of leather was knotted, making a loop, then alternating beads and beaded beads were strung on with knots in between each addition to hold all in place. This would also look great as a centerpiece for a necklace!
This humble little bead is being offered at Monica's Quilt and Bead Creation, in Palm Desert, for our first Bead of the Month project. By the end of January we should have several different ideas on how to use these beads and incorporate them into jewelry and accessory pieces.

Wednesday, November 30, 2011

Leather & Spice Necklace

Spice up a few pieces of leather, left over from your wraparound bracelet perhaps, with a mixed assortment of semi precious stories and trinkets. Add some silver or copper heishi, accent with a few more crystals and stir in a couple interesting focal beads to produce your very own OOAK necklace. Each design will be a chance to reflect your artistic voice and even tell a story. Have fun doing what you like best about beadwork.. the exploration of your unique creativity. Rest assured that no matter what the supllies for this piece cost you, it still won't be even close tot he $498 price tage that was attached to the inspiration piece.

Sunday, November 27, 2011

Wire Knitz Cuff

All this prettiness in just a couple of hours! The beauty of Wire Knitz, a new wire knit product, from SilverSilk, is that is can be manipulated in so many ways. Look for a few new versions in the coming days. By adding little tiny "belt loops" at each end I can change the bracelets I wear with the cuff. Small Antique Brass snaps will be added to the outer edges to help hold the wide cuff in place.
This particular focal bracelet was created with a few simple twists of the wrist using wire wrapping techniques to hold the flat glass discs into place. The leaves were attached using headpins with lampwork glass as the heads, awesome eh? A very clever artist, Starr May created these for me...all of her other glass pieces may be seen at Monica's Quilt and Bead Creations in Plam Desert, CA.

Tuesday, November 22, 2011

Christmas Spider

After hearing about the legend of the Christmas Spider from my friend Joann and that it was good luck to have a spider in your Christmas Tree I designed and created this lovely and friendly spider for my tree. Consisting of vintage gold beads, 8mm Swarovski pearls, 12mm twisted gold bugle beads, all intertwined on 26 gauge wire. The link below will take you to the story of the Christmas Spider, suitable for printing.

Sunday, November 20, 2011

Dawn's Starfish

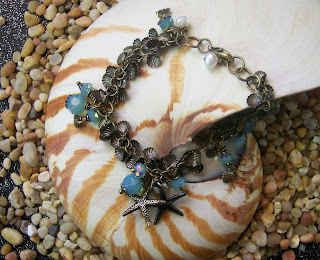
Since my daughter created a new logo for her swimsuit business, Deuce Reversible Swimwear, we've been on the hunt for great looking starfish charms. These beautiful Starfish are from Ruby Tuesday in Long Beach. The fun shell chain is also from them and availiable on line. Wire wrapped pearls add to the sea foam look. Check out the lobster clasps at each end, so it could be worn as a bracelet or a necklace. The crystals are Swarovski Pacific Opal Briolettes.

Monday, November 7, 2011

Vintage Blossom Earrings

These beautiful vintage Rose Blossoms were found by Monica during one of her buying sprees. This is just a simple version of a pair of earrings created by using traditional bead embroidery techniques. For some great ideas and wonderful instructions refer to the books by Jaime Cloud Eakins, one published in 2005 Beading with Cabochons and the new book, Dimensional Bead Embroidery. Both are comprehensive in the study of more traditional bead embroidery, long attributed to the American Indians. You will learn much from both the text portion and the schematics of the book. The photos are beautiful and well lit so all details are very clear. The Project portion of the newer book will give the novice beader clear and precise instruction about placement and color theory. The experienced bead artist wil revel in the design possiblilties and clever edge treatments and connections.These earrings began with the Vintage Glass pieces placed on Stiffy Stuff, which were then surrounded by the rose and mint colored seed beads. Turquoise leather suede was used as backing...a bit tough to stitch through at times, so I used my chain nose pliers to help pull the needle sometimes. The earrring post was glued inbetween the layers of backing before the edge stitching was finished. Three dangles hang from the center bottom beadwork, each supporting another vintage crystal. The smaller crystals are 3mm Swarovki Bicone Crystals.If you are in the Palm Desert area, stop by Monica's Quilt and Bead Creations to see these and other beautiful vintage glass cabochons. She has some very detailed pieces in bright colors and others in soft colors such as the ones featured here. Coming soon are Bead Kits and a patterns for two versions of these beautiful earrings.

Thursday, October 20, 2011

Transitions Bracelet

A fun collection of several types of black beads, including 3.4 drops, each stitched for about an inch and then changed into a different stitch. A good form of practice for tackling multi stitch projects. My first idea was to stitch a 7" swatch of each stitch and then wear it as a wrap bracelet. Well, of course, sanity got the better of me and in order to finish this up quickly, a revised shorter version was made. The influence for this bracelet is one of the newest Lark Master Beader Series, Maggie Meisters Classical Elegance. Several pieces in this book require more than just one stitch and often a knowledge of transitioning from one stitch into another is required. Thought this piece would make a great learning project. It includes; peyote, brick stitch, two drop peyote, ndebele, right angle weave and square stitch.

Wednesday, October 12, 2011


I was contracted to create a "Princess" dress for a company that provides characters for children's parties. Also added a pair of earrings inspired by Laura McCabe.


Saturday, October 8, 2011

Great tool for making patterns

Snipit Pro, Love this add on, allows you to cut out anything on your screen and paste it. I have used it in preparing my class notes, completing patterns and for the blog.

Monday, October 3, 2011

Tangerine Dream

Another beautiful piece for a Birthday Gal...This to coordinate with her lucious robe and gorgeous dress. It is comprised of Swarovski Crystals and loads of bicones, rondelles and other sparkly trinkets! Done in a monochromatic warm color theory, like many theories that can be found in Beverly Ash Gilberts Beading Colorways, an awesome display of color info.
The wirework was looped and secured and looped again...painstakingly placing the crystals...a joy in discovering the wonder for aspects of orange. See the little loops??? The wire was pulled as a thin ribbon would be, causing it to curl and wiggle. Fun!
This piece rests gently on the neck and lights up the room.. perhaps the birthday queen will send us a photo? This is perfect for showing off a glowing smile....Happy Birthday, La Terra!

Sunday, October 2, 2011

Orange Sunburst Earrings


A classic and yet innovative look at bezeling those beautiful Swarovski Crystals. Led by the influence of Laura McCabe, these sunburst earrings were just the right accessory for a beautiful friend for her Birthday Bash. Adding yet more bling, the row behind all the bicone crystals supports one more row of bling, top drilled bicones in 6mm Hyacinth. The center Rivolis are 16mm Chili Pepper, the crystals for the otuside bursts are Sunflower, FireopalAB and Indian Red. The seed beads used were DB 043, DB603 and gold334. The little picots were created using size 15 seed beads in #471, make sure they are permanent or duracoat.
Notice the backs of the Rivolis are completely closed. The method for this enclosure involves a series of shifts from one stitch to another. The circular peyote moves to the back and after two rows of size 15 seed beads, a repeating stitch of one bead up and one bead down is worked around the circle. This sets up the next stitch which is a three bead netting, which sets up again for either another row of netting, with a skip, and then peyote with one bead to close the tips. I find it rather important to close the back of the Rivolis or coat them to protect them and prolong the life of the crystal. Small tiny nicks in the back (often called flea bites in crystal) actually affect the front of the stone and interfere with the reflection of light. We want our Swarovski's to last as long as they can and keep their brilliance!
For more on these beautiful crystals, check out Laura McCabe's book, creating beautiful Crystal Jewerly with Swarovski. Of course, check out my classes at Monica's Quilt and Bead Creations in Palm Desert, where I show you a quick start with two needles and you can find those tiny, tiny size 15 vintage one-cut seed beads as well as lots of colors and sizes in Crystal Rivolis.
Oh, and I made these to be interchangable as well....look closely at the connection of the two earrings components. The links holding them together can be removed and each piece could be reattached to a new earring finding, making two sets of earrings. Add a bit of bling on the bottom of each and ta-da, a new look for both...one casual, one fancy.

Saturday, September 17, 2011

A Bead Hop, Nevada and Utah


From Cedar City, UT...The Bead Forest, quiant, right on Main St. at the center of town.


At Park Silly outdoor Market on a lovely Sunday...found again Beadniks!


My favorite in the heart of Salt Lake City, south of city in Sugarhouse. Next to Sundance outlet!


A definite stop in Las Vegas, outside the strip but worth a look around.


My new favorite bead shop in Las Vegas, closer to the strip, tons and tons of unusual collectibles!


Well along the way to visit my son and daughter in law in Utah we found a few good Bead shops! Most of these are places I had been to before and they truly never disapoint!
Driving up to Cedar City is always a pretty sight then in the heart of town is a familiar old bead shop, it used to be almost underground when it was across the street! He's a clever guy and does his own lampwork beads, carries an ecelectic variety of beads...even had a few little beaded fishes that a gal makes for his shop! Don't let the simple nature of the shop fool you, look around ,ask about the Delicas behind the counter! Gold plated and Platinum Delica beads..pricey but when you run out and need more, well, need I say more?


After a few days in Park City, is was time to run down the hill and visit Salt Lake City...even a few minutes in String Beads is worth it! I don't know how many bonus cards I have, but some day I will put them all together and qualify for a discount! Fun pieces to look at, lots of great beads hanging on the wall and a friendly staff. I noticed the owners eager to help a new beader learn a skill. Nice findings as well...a bonus, next door is the Sundance Catalog outlet store! Those are burgundy pearls that I will use in the Sophia Earrings from Maggie Meister's new book.


A bonus find in Park City...Beadniks which was in the Redmond Shopping center had closed....but wait for it.... the owner was selling her product (at a fabulous discount) at the Park Silly Market on Sunday. A fun surprise of which my dear hubby took a picture and posted on my facebook page! Found great pink leather for another wraparound and two strands of awesome 4mm round semi precious stones.


On the return trip, it was nice to stop in Las Vegas and check out a couple of old haunts...Sadly, Beads Plus has finally closed, but Discount Beads has expanded. Great deals on seed beads and more! Just couldn't take it all home so I only left with a nessecary handful. I did notice they must have every color of every size of Swarovski Pearl on a huge wall...Great staff ready to help when needed.


And then ... the FIND of the trip...a darling little shop with a simple name, Beads Findings, with so much inventory I'm going to have to go back a few times to look it all over. Easy to find and right off the strip I think...maybe a few blocks over but close enough. If you can't find what you want, ask the owner, she'll know just where it is and show you even more than you know you wanted...She had lots of great stories, too, as she had businesses in Hawaii and Spain over the years. A very interesting woman! Great silver, lots of old collectible pieces, surrounded by some of the current fashion bling of today. Hey, ya gotta keep up with the Joneses.


All in all a good trip and I kept busy while in the car! Almost finished the pair of brick stitched earrings, began the two drop peyote base needed for a pendant plus made two outer beaded bases for a round style bead. More to come on those! As for the easiest way to travel and bead, well my DH set up a board with a small pillow underneath, one of those with the little pebbly beads so it conforms to my lap. This trip I put a square of non skid gripper stuff on the underside, the type used for rugs, and it worked well and kept the board securly on my lap. The board has outside rims so that the beads don't slide off and all my nessecary bead kit items fit in a super cute zipper pouch that one of my Bead Chicks friends made for me a few years ago! Every pit stop I made sure to pick up any loose threads and there was never a tell tale sign of my work...well, except for the errant bead or two !

Friday, September 16, 2011

Transitions, a bracelet study of stitches


So, the wonderful new Master Series book by Maggie Meister has spurned an idea of sorts. A sampler of stitches and therefore the transitional flow needed to move from one stitch to another was created. I think this is a great way to prepare for what you need to learn in order to work from the book...of course, this is assuming that you already know how to use most of these stitches in several of their forms. The book utilizes movement from right angle weave to peyote to ndebele and then back again, so here is my study using those stitches. The first idea I had was to create a long wrapped beaded bracelet...each wrap a different bead and stitch...then I realized that would take too long and not be productive for a class setting...so you get the short version! I will still create the longer wrap as I think it's going to be a very cool looking bracelet!


I've created this in black, using beads with different surface finishes, even the little 3.4mm drops. It will also be great using multiples of color, or a study of other Monochromatic colorways or even dare I say it GOLD!!! Just be careful, always use a permanent or Duracoat finish when using a metal color. We at Monica's Quilt and Bead Creations in Palm Desert are lucky, almost all our colors are switched over to a "permanent" finish.

Wednesday, September 14, 2011

Double Decker Wraparound

Okay...so here's the first of many wraps I made along our trip to Utah! Hey, you gotta learn how to use those ten to twelve hours in a car wisely! More on my personal tips for a stable setup in an other post.

This wraparound bracelet was created especially for a dear young lady who is a Master Wig Maker and hair dresser for the Shakspeare Festival in Cedar City. She loves owls and I thought the colors suited her well. The cubes are 5mm Hex glass beads from Miyuki, the leather is brown round 1.5mm and the owl bead is a new item from TierraCast, a findings company usually well represented in most bead shops. This wrap was concieved with a slightly different approach, more of a loom stitch rather than a half hitch around the leather, multiple cords were set up and then the three rows of cubes were stitched all at the same time. It was quickly finished and the gift was nicely appreciated.

As you can probably tell, yes that is the dashboard as my surface for the photo...and as a testament for the smoothness of the ride, I do believe we were traveling at a steady 75mph when I shot the pic!

Wednesday, August 31, 2011

New book

Received this book in the mail yesterday but due to a last minute project that I took on I have not had time to do much more than flip through a few pages. Looking forward to our drive to Utah starting in the morning when I will have lots of hours to enjoy it. I took a class from her some time back and am really excited to start reading it.

Sunday, August 28, 2011

Vanessa, The next generation of beader

What a wonderful time we had in Saturday's class! Several beaders were hard at work on projects and the youngest of the group was Vanessa, a delightful, talented young lady from Rancho Cucamonga. She had come out to the desert to join her Mother and Grandmother in a beading session at Monica's Quilt and Bead Creations. Lucky for us she was willing to help in a project called 'Beading to Beat Autism'... Vanessa just kept on beading and before long she had made not one, not two, but ten stretchy bracelets for the cause! It was marvelous to observe the diligence she had in class and to note that she represents the young girls of the next generation of beading..she already had a great sense of color theory and excitement for the craft...I think we're in good hands for the future.
So, speaking of the future, the Autism project is spearheaded by a another young lady, Michela Riggles..she's been on the Ellen Show and others promoting her goal of raising monies for a research and educational facility in Kentucky. Read about her journey on her website; www.beadingtobeatautism.org it's an amazing undertaking for one so young.
As I said, our future is in good hands.

Sunday, August 21, 2011

My own personal Bead Hop


Bracelet found at one of the vintage shops on 4th St.

Spent a few days at the beach last week and was able to visit not one, not two, but three bead shops. The first, Beadology is a long time favorite in Huntington Beach. My husband then found two online in Long Beach. He drove (of course, I get to bead while travelling) Our first stop at Ruby Tuesday found that they did not open until 11, so onto Pudgy's, whoops, they sleep late too. What to do? Oh well, we were forced to go and eat pie at Polly's. Just down the street from Pudgys, so if you go, you must stop! Back to Pudgys where I met the owners and found that they stock a very large selection of Vintage beads. A bit over an hour later we were on the road back to Ruby Tuesdays, with a side trip to a block long area of vintage shops, where we found a great vintage starfish bracelet. Starfish were the theme of the day as I was looking for items to incorporate into designs for my daughter, Dawn Marie, who designs reversible swimsuits under the label "Deuce Swimwear."
It turned out the shops, all on 4th St. Long Beach were just half a block from the house John had lived in from about age 4 to 10 years old. We found the house and got some photos, tempted to ring the bell to ask for a look around but passed. Back to Ruby Tuesday which is a newer shop with a very enthusiastic owner and a very nice selection to choose from. She spent a lot of time with me helping to choose and showing me examples of her work.

Uniquely designed for Deuce Swimwear


A starfish bracelet commisioned by Dawn Marie for her custom swimsuit line, Deuce Swimwear. A new logo prompted the search for Starfish and of course, once the hunt was on there was no stopping us! The idea for this piece was shared by the owner of Ruby Tuesday in Long Beach (more about her shop in the next post). A clever use of seashell chain...that's hundred's of fragile little seashell charms I didn't have to link together...and Swarovski crystals in Pacific Opal AB rondelle shapes along with Freshwater Pearls and findings from TierraCast. A beautiful bracelet that went together quickly and thrilled the designer!


Look closely at the Starfish, since all of the swimsuits are reversible, the placement of the charms reflect the logo's design of two startfish side by side with one reversed. Many more styles to come in the near future...look for them online at the DeuceSwim site on Facebook.

Sunday, August 14, 2011

Dakota Turquoise Earrings

How's this for a feathery look without the feathers?!?!? Brick stitch a few colors together and then dangle loads of beads from the baseline. Here, I used all Delica cylinder beads in Matte Black #310, Red 723, Blue 166 and Nickel 035. Notice at the end of the dangles the lovely semi-precious stones in turquoise, the weight of these stones help to keep the dangles looking straight.

The earrings are comfortable to wear and the length of the dangles could be as long as you desired. Of course, there is nothing stopping you from adding an extra feather or two if you want more for effect. Simply attach the stem of the feather to a fold over crimp end and attach it at the same time you are adding the beadwork to th earring finding.

Saturday, August 13, 2011

Beading to Beat Autism...a Beading Girl's Night Out

What a fun night we had last night! To kick off the 2011 Bead Shop Hop, we introduced all attendees to the schedule of events upcoming in September. Wow, two weekends in a row seeking out all the great Bead Shops in SoCal...a beader's dream come true!
Tied into this evening was a worthy event as well, we all gathered around the beading table to create little stretchy bracelets that will in turn help a young girl's dream come to fruition! Check out www.beadingtobeatautism.com and read about Michala's story...she's only fourteen years old and has aspirations of building a center for education and research into the silent world of Autism. At age ten she raised over 250Thousand $$$ for her family and the treatment of her young brother, now four years later she desires funding for a Center in Louisville, Kentucky. Find out how to help her further this dream...
For some great pics of the night I'm sure we'll have some good photos on Monica's Quilt and Bead Creations web site, www.monicasquiltandbead.com. I bet we hold this event again so Monica herself can take part in the fun and others who were unable to attend can have another opportunity for fun , creativity and community service.
Above is my creation with Turquoise looking Magnasite and a Red Coral bead for contrast, remember your color theory?!? Lots of Silver spacers, nice chunks add a bit of panache! And then there is the puzzle Charm ( a symbol for autism)...given to me awhile ago by Deb, one of my Bead Chick friends. This Charm has some great words on the back as well...family, tradition, love, friends, charity...to remind us of what's important in our daily lives.
It was amazing to hear the stories of how many in attendance last night knew someone close to them who had Autism affecting a close personal friend or relative.

Tuesday, August 9, 2011

Granada Blossom

What a fun process this Blossom has been! Following a fabulous pattern by Sabine Lippert of Trytobead.com (Germany) this creation just looks better and better each time I work it in different color schemes. Since we're playing at the beach this week, I've been insipied by all sorts of colors, the base starts with the Coral Swarovski Pearl and then gets embellished with beautiful turquoise, lime and lavender Swarovski 4mm crystals. Some 3.4mm mini drops were also used in part of the accented parts. A delight in color theory, each placement of a new color changes the look of the piece. I created this piece in just about an hour...with ideas forming for a necklace of a different sort and perhaps a bracelet with a similar picot treatment.

Visit her website for an amazing look at a very talented artist. I think she is scheduled to teach at the Bead Fest Philly Show. Pattern and or kits are very reasonable, her detailed instructions are availiable in English and quite understandable.

Look for my Black and Silver version coming later this week!!!


Saturday, July 30, 2011

Mags on the Wave Ring


Here is an example of the Wave Ring, a Cellini Spiral ring made popular by Cindy Pankoff, using long magatamas as the high point of the ring. Looks pretty cool don't you think! I can make this ring in about an hour, with distractions such as a car ride or watching shows recorded on the DVR. Well, now you know how I manage to get so much beading done! Multi-tasking is an obession of mine...oh wait, is that a sign of ADD as well??? Oh never mind, cuz I have to get back to piles of new beads.


For this ring I used the longer 4x7mm magatamas, size 8 seed beads, size 11 seed beads and then a series of five colors of Delica beads on Fireline...Cellini is a version of Peyote stitch. We'll see how long it lasts! I have been told the Fireline dissolves over time and I think in water!?!?!? I know it tends to break when a knot is tied...so now I only just weave away the loose ends and use a Thread Burner to cut.

Thursday, July 28, 2011

Fresh fish for Thursday

Special of the day today includes a beautiful beaded Fishy created for a Fish Challenge in a yahoo bead group. What a fun a thoroughly addicting process this has become! It seems that every beaded project I have on my table also ends up as a fish! This simple peyote Beaded Bead has subtle embellishments, using picot ends for the drops and a little bit of right angle weave to add the tail. It would be easy to use a bead soup mix to create one of these!

Sunday, July 17, 2011

Senorita Bonita

Look what swam over from fantasy lagoon! As a member of Beaddreamz (a yahoo group), the current challenge is creating colorful fish...well, who knew it could be so much fun!!! (work? what work???) I have made a couple for the swap, those are kept under wraps, but this little Beta beauty seems to have found a home. Her name is 'Senorita Bonita', pretty little Miss, a fanciful Fantail Fandango, whose origins are somewhat dubious but most likely she comes from the Deep Blue Seas of the Pacific Rim.
A simpler version can be seen at the Beaddreamz site, check photos for "2011 Fish Challenge" and "ZZZ Fish Challenge 2008", a past swap with photos.
This is similar to making a beaded bead, using peyote stitch. Lots of beads were used, including pink, coral and purple seed beads, Delicas and crystals.

Thursday, July 14, 2011

Garden of Beaden, Upland California

Had heard of this shop from my beadchick friends but never visited until last Saturday. You can feel the creative energy as you walk in the door. A small shop with large amount of creativity.

Sunday, June 26, 2011

Crystal Bling Ring

Have been experimenting with the granulation theory of Right Angle Weave...first touted by Shelly Nybakke in the June B&B of 2007. Here is a sample of the Crystal Bling Ring I created using RAW as the base, then fashioning a Cubic RAW top of beautiful Capri Blue 2XAB Swarovski bicone Crystals. Wow! Turned a simple Ring into a big Bling Beauty! I like the vertical nature of the center's position better than the other crystal ring I did last week. The base made using the Metal Seed Beads, here using size 8's.

Monday, June 20, 2011

Layered Bling Ring

This Right Angle Weave creation was inspired by the bangle bracelet by Shelley Nybake, in Bead & Button magazine from June 2007. Anxious to work with the silver Metal Beads, but not wanting to spend time doing the whole bracelet, I thought of creating a square on top of a beaded base. Now you see where this is going don't you? A simple square was not enough, so the next layer became full of Bling thanks to Swarovski 3mm bicone crystals...here in Olivine 2xAB and then another layer of Metal Beads...next, I was thinking of making another ring with the square placed more vertically on the base, it will look nicer on my short fingers, ha!

Friday, June 17, 2011

Aloha for Patti

My friend Patti left for Hawai'i this week and this bracelet is going to follow her there! Made with 4mm semi-precious stones of Ocean Jasper and 1.5mm leather, this wrap around bracelet has Ian organic and natural feeling about it. The button read 10-4 on the face, i think I've had it since the 80's. Ha! Just the thing to wear in Hawai'i.
I know Patti will be having tons of fun playing with her new grandson Ka'iwi...As I was making this bracelet I kept thinking about how happy she must be with her son and his lovely wife and newest addition to the family. Aloha Patti....enjoy the island life, girlfriend!

Friday, June 10, 2011

Rock 'n' Roll leather wraparound


Out in the SoCal desert we are having too much fun with these wraparound bracelets.


Deb, our dear friend and fellow Bead Chick decided to create a wrap using two different sizes of metal Thai Silver beads and a very pretty red/coral leather. Well, I thought it was too good of an idea not to share and have made one with skinny black leather as a birthday gift for a friend. Elegant, yet tough chica looking don't you think? Can't wait to make one of my own!

Tuesday, June 7, 2011

Peanuts!


What wonderful undulations are created when you use a peanut beads in place of another! These stone color beads...of the #900 series, are beautiful when showcased on this bracelet next to black and silver. They would be equally pretty next to other shades of gray and brown I'm sure. A fun way to experiment with the peanut beads is to replace a seed bead in your pattern with these little beauties. Here, using a peyote stitch, they replace a line of size 8 seed beads. They have more vertical way about them and look good inside the piece as well as on the outside perimeter. Note the little detail on top of the loops of the slide closure, a size 6 sb with a Delica or size 15sb on top. Do this after you secure the slide to your work, used as embellishment only.

Monday, June 6, 2011

Tila Beauty


What a fun new bead is the Tila! I have had a great time developing new pieces using these beads in the most unsual ways. This piece involves peyote, square stitch and right-angle-weave, just to keep it simple! The most exciting part is that I haven't seen this version any where yet, so I'm happily submitting this item to a bead mag and we'll cross fingers and hope it sees the light of day! Of course, it will be on my roster of classes at Monica's Quilt and Bead Creations for those more adventurous students. The beads here are Tila beads, 4mm fire-polish and size 11 seed beads built using one-G thread, altho' I would also us Fireline or Wildfire.

A big plus...my daughter, Dawn and her friend, Jessica both admired the piece, so it could be a hit! Maybe Dawn would wear one in grays and black???


Tuesday, May 10, 2011

Tila Film Strip Bracelet


What a wonderful chance to use these marvelous Tila Beads! Work this braclelet as you would a semi precious stone leather wrapped bracelet, just remember to stay in place and catch both holes! On this piece I used both a matte and shiny gray Tila bead, just picked up at random and it created such a translucent effect that I thought it looked like film strips...you know the old 35mm kind before there was digital media! Each color used weighed about 10 grams of tila beads and the leather was 1.5mm thick.


Thursday, May 5, 2011

Star Power Bracelet

As promised here is the bracelet I designed using the Star Power influence from the earring pattern. Note the cute Beaded Bead Ball at the end , this was a vintage piece from a collection located in New Jeresy. It could be easily replicated using a 12mm wooden bead and several passes with small beads such as 15's or small Hex seed beads. The button loop was created using a simple peyote ring of beads, then making a few passes and on the last row forming a picot of five beads, the middle bead a peanut. Love these new shapes of beads!
Bead-weaving techniques such as peyote and right angle weave were used.


Monday, May 2, 2011

New Olivine Beauties


Away for the weekend up at the Crestline cabin...a first in about four or five months! Treated to a new Bead and Button magazine in the mailbox just waiting for me when we got home. A darling earring feature by Gloria Ljubich using peanut beads got my creative juices flowing again so here is the result. Of course, I had to try things my way and one thing led to another so this piece was stitched with one continous thread, not in separate components as in the pattern. I mananged this by using right angle weave, my stitch of choice. Wait til you see the bracelet I conncocted inspired by this project.

Now to make another set of earrings that I will actually be able to wear, as this runway length just looks silly on me! I'll share this with my Beading friends at my Sit-n-Bead Class tonight as I think everyone has the magazine by now.

p.s. a good issue (#103) with lots of goodies

Wednesday, April 27, 2011

Happy Easter Week

Look at what the easter bunny did to my egg! Almost like an oversized beaded bead. This ornamental covering was supposed to include pearls, but the ones on hand didn't have the right type of holes. So, to improvise I used small mini drops instead and a did a varigated colorway. Umm, could be a useful idea for next year. I would have to start sometime in February!

This combined a peyote base row, right angle weave and netting stitch.

Monday, April 25, 2011

Happy, Happy Springtime

Happy Spring and Happy Easter to all... the new color for Spring and the Year is captured here in this sweet glass covered bracelet. Any of the Coral to Pink to Rose hues will brighten one's day don't you think? Try adding 3.4 mini magatamas as the embellishment to any one of your favorite bracelets. Or make a beaded bead and put them on the outer edges, ummm, pretty.
This special dainty bracelet I learned from a dear friend, now excuse me while I go make one in every color of the new Spring colors; turquoise, yellow, gray, parrot green and beeswax!

Monday, April 18, 2011

Slip Knot Lariat


A new delivery of sparkling Swarovski Pandora style beads has come into the shop, so we are all putting our heads together and coming up with ideas on how to use them in other ways. I remembered this fun idea that was shared with our beading group, the Bead Chicks, from the talented Robin Cowart of wegotthebead.com. Of course, my end product has been tweaked a bit, I added the dangling bits and changed the construction but she planted the germ of an idea...and a good one, too! Taking a long enough chain to fit over your head, fasten a larger bead, here I used a silver cube bead at one end. Add more chain below the bead for fashionable interest and now you have a support structure for the large hole beads. I suppose you could do this for Dzi beads or other gemstones with a large hole. The caveat to remember is that the width of two chains, sliding inside the hole, must fit easily into the large hole beads. Now you can buy one or two colors each and wear multiples or switch them up to match your wardrobe! Later, I'll show you how beautiful the new interchangeable designer beads are going to look, instead of these cat's eye stand-ins. Fun...Fun...Fun

Monday, April 11, 2011

From the deep blue sea...


Here is the lovely necklace I wore as Mother of the Bride, now called Mermaids Delight. Aptly named by the mermaids father (who was also Father of the Bride). This piece was created with our dauther in mind, the lovely Dawn aka the mermaid, on the occasion of her lovely October wedding to the young man of her dreams, Jeffery. Her shoes happened to be tall, beautiful satin heels of this deep oceanic blue...well, it was all the inspriation I needed to begin this creation.


It's elements include fresh water pearls, Swarovski crystals in Peridot, EmeraldAB, IndicoliteAB, Jet2XAB with a few Vintage Margaurites and two-toned 18mm Electra Rivilois. Various seed beads in sizes 15, 11 and delica beads were also used. A right angle weave base supports several clusters of flowers and leaves to form the bouquet style necklace. Each peyote stitched flower took about an hour to complete with several of the large ones taking a few days working on them here and there. Total time to complete estimated at two months. My dear friend and fellow Bead Chick, Jeanette helped me in crunch time and made the sprial rope, so delicate because it's all made with 3mm crystals and size 15 seedbeads.

I actually added a small element on the lower corner, if you look at the photo (of the necklace being worn) there seems to be a space where the point should end. I did mean for it to be asymetrical, however, it was a little off at the point so I added the small flower bit and it is much better now and complete.


So I'm happy to say that John took a photo and we entered it in the BeadStar contest...should know by June if it places in the finals. Hip-hip-hooray. I actually followed through on something and completed the paperwork, that in and of itself makes me happy!